MAKE YOUR OWN
3D DELTA PRINTER FOR CERAMIC
|
Annoyed and frustrated by 3D Systems buying out and then stopping the production of the RapMan 3D printer. This was the first kit printer Belgian design duo Unfold adapted to print with clay and has subsequently been copied and widely used by others, I decided to develop my own replacement 3D printer. Based on the delta type of 3D printer my aim has been to use parts that can either be made with basic DIY tools and skills, or ordered off the internet. The design is specifically for printing in clay but could be adapted to work with other materials. Many other self build 3D printers use parts printed in plastic but with this project I did not want to be reliant on already having access to a 3D printer.
This document is not a blue print for building a 3D printer but more my documentation of what I have done. My experience is as an artist and not as an engineer or computer specialist so I am sure there are many improvements that could be made but this is what works for me. I welcome others to take up the design and develop it further but only in a private or research and education context. Please respect my ethos of sharing and the humanity to be found in generosity. This project was borne out of the disgust of the practices of big business so please do not blatantly use the information I am offering for commercial gain.
Being more interested in what might be creatively produced with 3D printers I am happy to contribute openly to the growing knowledge based around clay and computerisation but it come with a warning. As difficult as it is to pull all the technology and computerisation together I suggest it is even more difficult to do something creative, fresh and meaningful with this technology. I look forward to seeing what others can do with it. By 3D printer standards this is a rather primitive tool set, but it does offer an accessible way into a very exciting new way of working with clay.
|
PARTS
Mechanics -
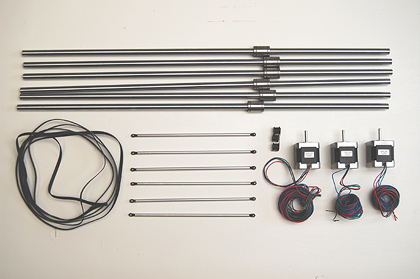
*6 x 70cm 12mm steel rods
*6 x linear bearings to fit steel rods
*3 x High Torque Hybrid Stepper Motors SY42STH47_1684A (Holding Torque 4.4 Kg-cm)
(All the above I get from Zapp Automation, UK)
*6 x arm rods with ball joints
(These I made up with aluminium rod and model car Traxxas Rod Ends)
*3 x 1200 mm length 6mm wide GT2 pitch (2mm) belts
*3 x Aluminium GT2 Pulleys for the stepper motors.
|
|
Electronics -
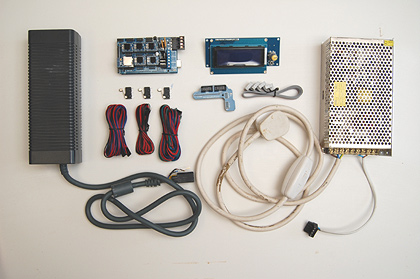
*1 x Arduino Mega 2560 microcontroller board
*1 x RAMPS 1.4 set that is complete.
*1 x LCD and SD card panel that plugs into the RAMPS
*3 x Mechanical Endstops
*100k thermistor (Not needed for clay but needed to keep the firmware happy)
*A good selection of cables
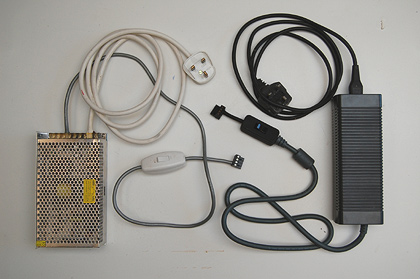
*Power supply options
Left, X Box
Right, General purpose power bricks 12V 220W
(Both available on Amazon)
Below a pictorial bill of parts based on suppliers convenient to the UK. (This is only considered as a helpful guide and no responsibility is taken for this information so please check all items before ordering for your suitability)
Delta Ceramic 3D Printer Bill of Parts
|
|
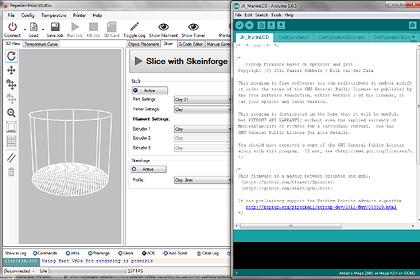
Firmware – I use Johann Rocholl’s modified Marlin firmware. I have had a look at the Repetier firmware but got the Marlin going first so have stuck with it. Here is a copy of the CeramicPrinter_MarlinLCD firmware that I have setup for this build. The Download ZIP is lower right on the link page. See the 'Build your own Ceramic 3D Printer' Google+ Community page for more information.
Software – To create and edit 3D files I use the open source 3D modeling program called Blender.
To slice up the .stl file to gcode ready for the SD card that carries the information to the printer I use Repetier –Host.
Delta and clay Settings for Repiter-Host PDF Download
|
|
Printhead –
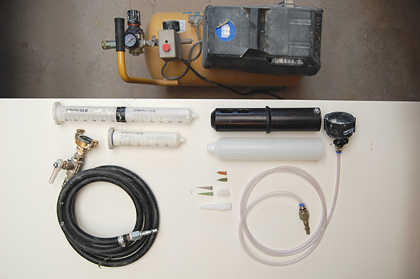
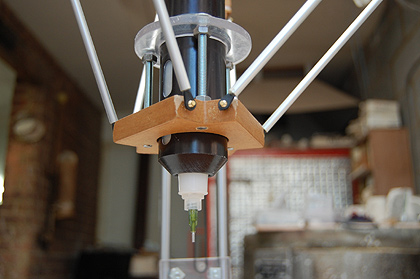
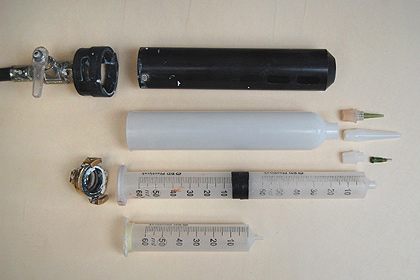
The clay extruder is simply parts adapted from the adhesives industry . I use parts from the Techcon Systems TS Series dispensing gun, using the cartridges, retainer body and cap but not the gun grip - right.
Left - syringes originally used. The clay is extruded with compressed air.
|
|

BUILD
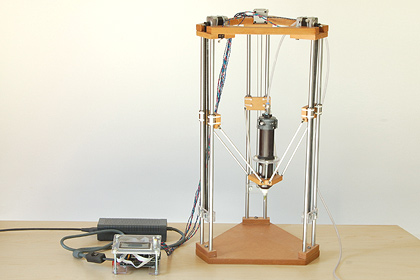
Basic Frame – The steel rods offer vertical rigidity while also being the runners for the plates to which the print head arms are attached. To ensure the whole structure is rigid the rods are a tight fit top and bottom where I have doubled up on the thickness of the MDF to help.
|
|
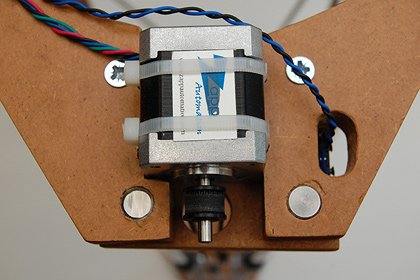
Motors – the motors are mounted at the top to keep out of the mess from clay and clay dust. For the same reason the controller is separated from the main print unite. The motors are held in place by the MDF top elements and secured down with plastic pull ties. The pulleys are supplied in the ULTRA SET from fabster3D, including allen key that is a nice touch.
|
|
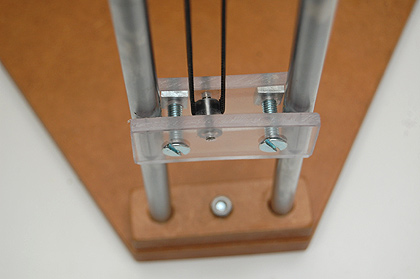
Belts – The belts I use are continues so easily tensioned up on a self made pulleys held by the plastic plates attached to the steel rod. (Return pulleys made from two tap washers, or 6mm then x mm plastic tubing on cut steel nail)
|
|
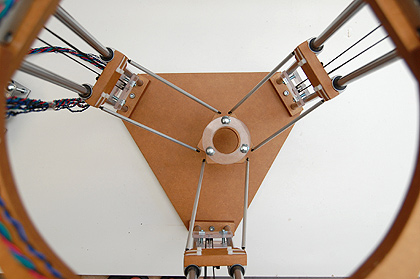
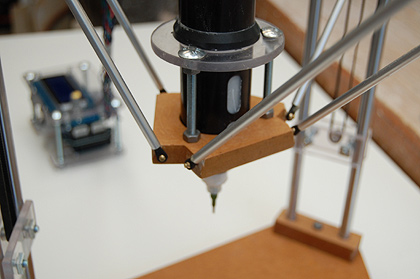
Arms and extruder mount – The arms are made up using a jig to ensure they are all the same length. Model car ball joints ar glued into aluminium rod from a DIY store. On the jig the nails that the rose bearing at each end of the aluminum rod push onto are 24 cm apart. So the arm length to pivot point on each end is 24 cm. I calculated it by the stretch the arms would need to make to scribe the 20cm max printing circle within the three support columns. I felt at full extent an arm would best be just off horizontal. The arms are then pinned and glued into the runner mounts and extruder mount. The extruder mount has a simple cradle to hold the clay cartridge.
|
|
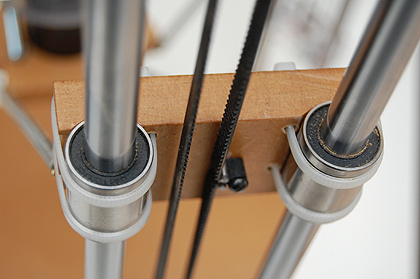
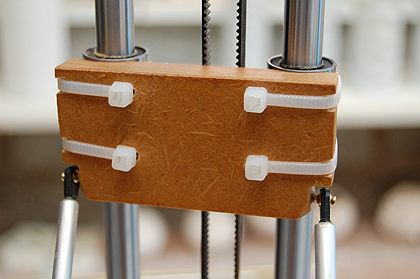
Runner plates – From experience it is important to have a good and square fit between runner mount plate and bearings. With a self made tool I sand a hollow to bed the plate up against the bearings. The plates are secured with plastic pull ties onto the bearings. The belts can then be secured onto the runner plate.
|
|
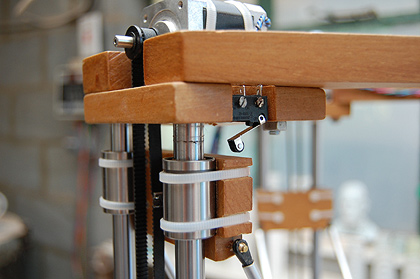
End stops – I only have endstops at the top where the print head zeros before each print. The wiring configuration is tricky but by trial and error I got it working use two terminals on the mechanical endstops that are provided in the ULTRA SET.
|
|
Processor – I get the ULTRA SET from fabster3D on EBay. They have been very good and deliver to the UK from Hong Kong in three day. The set is sold for plastic printers so includes a MK2a heatbed that is not needed with clay so negotiate a swop for 3 x 1164mm length 6mm wide GT2 belts.
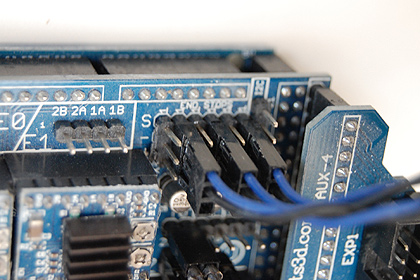
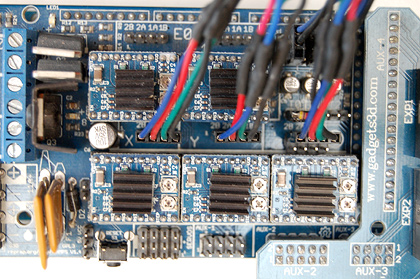
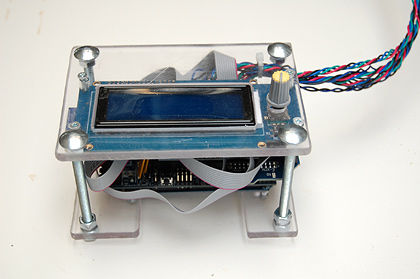
In the ULTRA SET the RAMPS board arrives sitting on the Arduino ready to go. The gadgets3d.com RAMPS board is well marked out for what goes where. There is an extra mini SD card and board attached that needs to be removed first so the main LCD screen and SD card board can be plugged into the RAMPS board. I pair up the motor and endstop to an X a Y and a Z column (although for the movement of a delta printer the x, y and z is not meaningful) so they correlate with how they are marked on the controller board. Wires are twisted together with a drill, cut to length and the relevant end fitments solder on keeping all colour coding. The end stop wires are plugged in ensuring they are in the slot for the top endstops - second slot for each x, y, z mark on the board. The thermostat I cover below but in the video I slot that in next. The X, Y and Z motor drivers are clearly marked on the board, as is the wiring for the LCD screen and SD card. With clay printing I am not using a heat bed so power is only attached to the 5A +-, see power below. This leaves many slots on the RAMPS board unused.
|
|
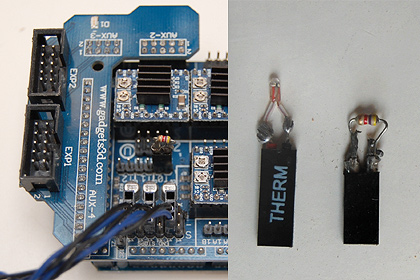
Thermostat – The program running the printer – firmware, checks for a thermostat as it is programmed for plastic printing. Printing in clay no thermostat is needed but without a thermostat plugged into the RAMPS board it will not run. A small resistor or the 100K thermostat supplied in the ULTRA SET plugged into the first temperature slot seems to keep the firmware happy.
|
|
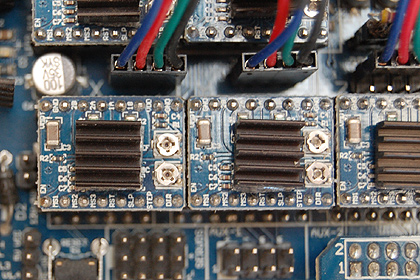
Stepper motor tuning - Each stepper motor driver board has two star headed adjustment screws. When I first started up my printer although the motors made a hum they would not move. Each screw has one flat side that when fully turned down – anticlockwise, sits at about 10 o’clock. With the power off I gradually turned up – clockwise, the top screw for each motor. Too much and apparently more power goes to the motors but then they heat up. I have found turning the flat side to around three o’clock is strong enough without the motors getting too hot during continues printing. I am not quite sure what the lower screw is for but on the fabster3D EBay webpage they suggest leaving them turned fully anticlockwise.
|
|
Power supply – I have tried both a LED Strip light power supply, 12V 20A 240W (left) and an XBox 360 175W power supply (right) and both do the job. I am not qualified in the finer details with regards electricity so would not like to pass on any incorrect information but as with all the information in this documentation it can easily be found on the internet. I have put an inline switch just before the plug that goes into the control board so the printer can quickly be turned off if there is a problem.
|
|
Printhead – The clay extruder is simply parts adapted from the adhesives industry. The soft clay is extruded out of the cartridge with the use of compressed air, around 30 psi (pounds per square inch) or 2 bar. The air pressure set against the consistency of the clay controls the rate of flow of the printing material. The extrusion rate is around 1mm per second. Excuse being vague with this information but, one I am not methodical about each setting as there are so many variables I relying on my tacit knowledge of working with clay and the general feel to get it right – not helpful I know. Secondly I use different setting for different scales of work and different clays and different shapes. Small work will be extruded with a 1mm nozzle while larger works will use a 2 mm nozzle. Small work is sliced at .5 to .6 mm per layer while I scale up to .9, 1mm for larger prints. Most work is printed with a single wall but forms that flare out such as bowls it can be useful to print a double wall.
Copying the Unfold technique I originally used syringes to hold the clay, as big as I could find and would glue two together to get a better volume of material. Then I found the Techcon Systems TS Series dispensing gun and so make use of the cartridges, retainer body and cap but not the gun grip. I attach a standard ¼ inch ball vale on/off switch onto the cap where the air pressure hose comes in to manually switch the pressure on at the start of a print and off at the end. During the print the flow of material is continues. A technical point that could be improved for shapes where you want the build material to stop and then begin again at another point as the print head keeps moving.
|
|

FURTHER REFERANCE
Johann Rocholl’s online documentation is very useful - RepRap wiki and Thingiverse.
Russ Gries Delta 3D Printer Project on YouTube has been useful.
UNFOLD blog is good about clay extruders.
Search YouTube for ‘loading Marlin (or Repetier) firmware’ and you will get lots of useful advice.
Google Group - Delta robot 3D printers.
Fabster3d is the eBay name for gadgets3d.com that is a website that sells all the same stuff.

HOW TO USE YOUR PRINTER
(Filmed for the International Ceramic Research Center, Guldagergaard, Denmark )
Repetier-Host for Ceramic 3D Printing - Delta and clay Settings for Repiter-Host PDF Download
Clay preperation for Delta 3D Printing
Printing with the Delta Ceramic 3D Printer |